DIY Baby Room Paintings
A while ago I posted about my baby's mismatched decor. You can find the post here. There were a few DIY projects that I did for this room that I wanted to share. These DIY projects are really the easiest projects you can find - so if you are not so crafty but want to decorate your baby's nursery for cheap - you came to the right place :).
These paintings were done with mostly dollar store items and in the end only cost me about $12 to make.
What you need:
- 4 Canvases (Dollarama)
- Black, White, and Pink Acrylic Paint (Dollarama)
- Painters tape
- Ruler and pencil
- Paintbrushes
- Animal wood cutouts (Found at Michaels for 75 cents each)
- Glue Gun
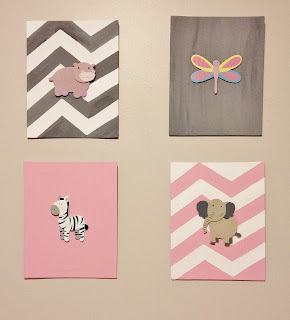
1. Begin by painting one canvas pink, and one canvas gray (by mixing the black and white paints).
2. Next, work on the chevron paintings. To make the chevron pattern:

3. To finish off the paintings, glue gun animal wood cutouts in the centre of each canvas.
Not only is this a cheap and easy way to add some decor to your baby's nursery, it is also great to be able to add your own special touch for your baby!
These paintings were done with mostly dollar store items and in the end only cost me about $12 to make.

What you need:
- 4 Canvases (Dollarama)
- Black, White, and Pink Acrylic Paint (Dollarama)
- Painters tape
- Ruler and pencil
- Paintbrushes
- Animal wood cutouts (Found at Michaels for 75 cents each)
- Glue Gun
1. Begin by painting one canvas pink, and one canvas gray (by mixing the black and white paints).
2. Next, work on the chevron paintings. To make the chevron pattern:
- Use painters tape to cover up the part that you are not painting. I began with painting pink (or gray) and so I covered up what I wanted to be white. Use a ruler to help with placing the painters tape exactly where it should be in order to make each section the same width. This is probably the part that will take you the longest and the most concentration.

- Once the paint dries, simply switch the painters tape to go on top of the pink part of the pattern and then painted the rest white.
- Once this dries, take off the painters tape and touch up any edges that you see might need it to give it a finished look.

3. To finish off the paintings, glue gun animal wood cutouts in the centre of each canvas.
Not only is this a cheap and easy way to add some decor to your baby's nursery, it is also great to be able to add your own special touch for your baby!

Comments
Post a Comment